
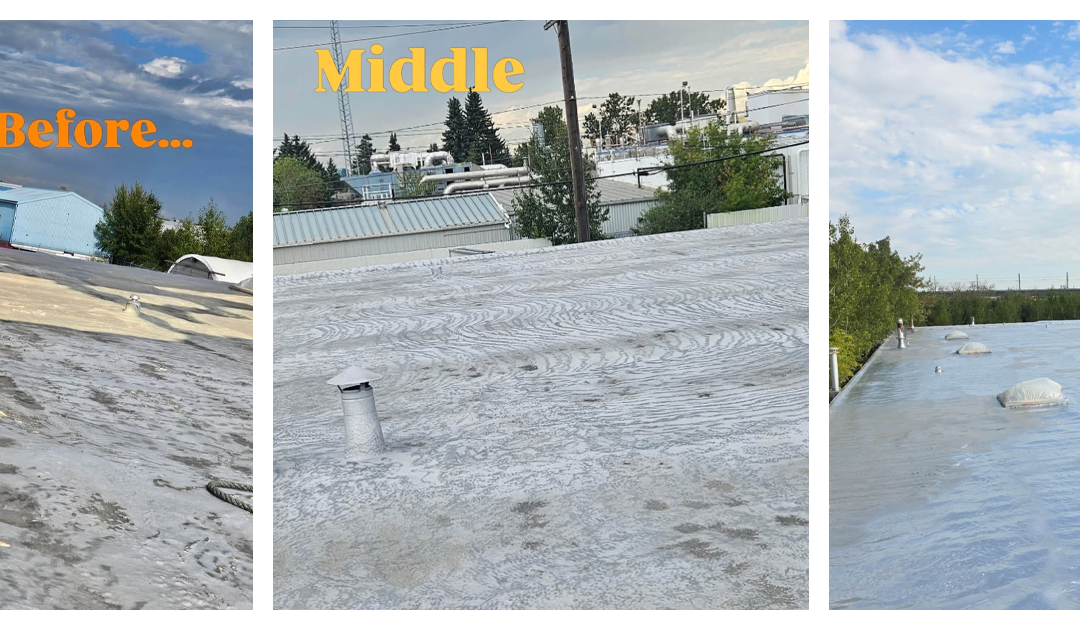
The middle photo from this Edmonton roofing project usually gets the most attention. Those visible stripes are not decorative, and they are not the finished roof. They show the pattern created while the spray foam was being installed in a series of controlled passes.
This project moved through three visible stages: an older, weathered roof surface, the spray foam application, and the completed protective coating. Together, the photos provide a useful look at how a spray-applied roofing system is built rather than simply showing the finished result.
Northern Spray Solutions provides commercial spray foam roofing services for flat and low-slope buildings in Edmonton and throughout Alberta.
What Do the Stripes in the Spray Foam Mean?
Spray foam roofing is applied directly to a properly prepared roof surface. As the installer moves across the roof, the material is placed in planned passes with each pass overlapping the previous area.
The striped appearance in the application photo shows the path followed by the installer. Maintaining a controlled spray pattern helps the crew build more consistent coverage across the roof rather than applying material randomly.
The application pattern also helps the installer:
- monitor the area already covered;
- maintain consistent overlap between passes;
- identify sections that still require attention;
- work methodically across a large roof;
- follow the shape and contours of the existing surface; and
- build the required roof profile according to the selected system.
The foam’s appearance during installation is different from the completed coated surface. The application pattern becomes far less noticeable once the foam has been inspected and the protective roof coating has been installed.
The Existing Roof Must Be Assessed First
A spray foam roofing project does not begin with spraying. It begins by reviewing the existing roof and determining whether it is a suitable candidate for the proposed system.
The before photo from this Edmonton project shows an uneven, weathered surface with areas of previous material still visible. Conditions like these need to be examined before new material is applied.
Depending on the roof, preparation may include removing dirt and loose material, identifying damaged sections, addressing unsuitable substrate, and preparing penetrations or transitions. Existing moisture or structural deterioration cannot simply be hidden below a new roofing system.
Not every worn roof is automatically suitable for restoration. The condition of the roof deck, existing materials, drainage and previous repairs all need to be considered. Our article about flat and low-slope roof coating systems explains some of the conditions that should be reviewed before proceeding.
Building the Foam Layer in Planned Passes
Spray polyurethane foam is created as two liquid components combine at the spray gun and react on the roof surface. The material expands and forms a rigid, adhered foam layer. You can learn more about how spray polyurethane foam works.
Installation still requires considerably more control than simply pointing the spray gun at the roof. The installer must consider the specified roofing system, the existing surface and the conditions at the time of application.
Controlled passes help limit thin spots, excessive buildup and abrupt changes in the roof profile. The goal is not to create perfectly decorative stripes. The goal is to build the foam methodically and achieve the coverage required for the project.
Weather and surface conditions also matter. The products must be installed under conditions that meet their application requirements, and the roof surface must be properly prepared for adhesion. These details are part of why spray foam roofing should be treated as a complete roofing process rather than a basic surface coating.
Spray Foam Is Not the Final Exposed Surface
The middle photograph shows an important stage, but the roofing work was not finished at that point.
Once the spray foam was installed and ready for the next stage, a protective coating was applied across the surface. This coating protects the foam from sunlight and ongoing weather exposure while creating a more uniform finished roof surface.
The two after photos show how different the roof looks once this coating has been installed. The visible application passes are covered, and the roof has a continuous finished appearance.
Our spray foam roof coating project in Devon provides another example of the relationship between the foam base and its protective coating.
The coating should not be treated as an optional cosmetic layer. It is part of the selected roofing system and plays a different role from the insulation and roofing foam beneath it.
Details Matter as Much as the Open Roof Area
Large, open sections of a flat roof can make up most of the visible surface, but many roofing problems begin at details and transitions.
These areas can include:
- vents and pipes;
- drains and low areas;
- roof edges;
- curbs and flashings;
- seams and transitions; and
- rooftop mechanical equipment.
The penetrations visible in the completed project photos must be incorporated into the roof system rather than sprayed around and forgotten. Material placement and coating coverage need to continue carefully around each detail.
Our rooftop unit roof repair project shows why curbs, equipment and roof transitions deserve focused attention.
Questions to Ask Before a Spray Foam Roofing Project
A building owner or property manager considering spray foam roofing should ask more than how quickly the work can be completed.
Useful questions include:
- What condition is the existing roof in?
- Is the roof a suitable candidate for spray foam or coating?
- What preparation and repairs are required?
- How will vents, curbs, drains and other penetrations be detailed?
- What foam and coating system is being proposed?
- What conditions are required during installation?
- How should the finished roof be inspected and maintained?
The answers will depend on the building, the existing roof assembly and the requirements of the proposed system. A site review is the appropriate starting point.
Edmonton Spray Foam Roofing Project
This Edmonton project is a good example of why the stages between “before” and “after” matter. The striped application photo shows the controlled passes used to build the foam layer. The finished photos show the roof after the protective coating was added.
For building owners, the most important takeaway is that a finished spray foam roof depends on preparation, consistent application, careful detailing and a compatible protective coating.
If you have a commercial flat or low-slope roof in Edmonton or elsewhere in Alberta, contact Northern Spray Solutions or call 780-963-4493 to arrange a site review.